If you’re a Minecraft fanatic like me, you know that one of the most enjoyable parts of the game is exploring and building on a vast landscape. But what happens when you want to create your own masterpiece on a blank slate? This is where terraforming and landscaping come into play.
In this guide, I’ll share my expertise in transforming any barren Minecraft terrain into a vibrant landscape ready for building. From mapping out your ideas to creating natural-looking water features, this guide has everything you need to know to make your Minecraft world one-of-a-kind.
Whether you’re an experienced player or just starting out, this guide will take you through the ins and outs of terraforming and landscaping in Minecraft. So grab your tools, and let’s get started!
Choosing the Right Tools and Resources for Minecraft Terraforming and Landscaping
Having the right tools and resources is crucial for Minecraft terraforming and landscaping. In this guide, I’ll share some tips on choosing the best tools and resources for your next Minecraft project.
Terrain Editing Tools
The first step in any Minecraft terraforming project is to alter the terrain.
Here are some of the best terrain editing tools:
- Shovel: Using a shovel is the easiest way to modify the terrain of your Minecraft world. You can dig and fill holes, smooth out rough patches of land, and create inclines and declines in the landscape.
- Pickaxe: A pickaxe removes large portions of stone or dirt. It’s also the only tool to break blocks made of tough materials, like diamond and obsidian.
- Axe: While not as useful as the shovel or pickaxe, an axe can be used to chop down trees, break wooden blocks, and collect wood.
Landscaping Resources

Once you have your terrain editing tools, it’s time to think about the resources you’ll need to create a beautiful landscape.
Here are some ideas:
- Trees: Trees are essential for any realistic-looking Minecraft world. You can plant saplings and allow them to grow into trees of varying sizes or use bone meal to make them grow instantly.
- Flowers and Grass: Adding different types of flowers and grass to your Minecraft world can make it look more vibrant and alive.
- Water: Water can be used to create rivers, lakes, and oceans in your Minecraft world. It can also be used as a decorative element, such as a fountain or waterfall.
- Building Materials: Finally, don’t forget about building materials, like blocks and textures. These elements can be used to build houses, roads, and other structures that seamlessly fit into your Minecraft world.
Choosing the right tools and resources is critical for your Minecraft terraforming and landscaping project. By using the terrain editing tools listed above and incorporating landscaping resources like trees, flowers, and water, you can create a truly beautiful and immersive Minecraft world.
Preparing the terrain for landscaping
In Minecraft, the terrain forms the foundation of your world. Your creative potential is only limited by your imagination and your ability to modify the terrain. Before starting any landscape project, taking some necessary steps to prepare and analyze the terrain is important. Here are some tips for preparing your terrain for landscaping:
1. Survey the terrain
Before you start any significant terraforming, take some time to survey the terrain. Take note of the natural features you want to preserve, such as hills or bodies of water. Consider the size of the area you want to modify and the materials and resources you will need. This will help you plan your project better and avoid unnecessary mistakes.
2. Clear the area
To make space for your landscaping project, clearing away any obstacles that may hinder your progress is important. Remove any trees, shrubs, or other vegetation that may be in the way. Flatten any uneven areas with tools such as shovels or pickaxes if necessary.
3. Choose the right tools
Using the right tools is essential for achieving the desired results. For example, using a shovel to dig through rocky terrain is not as effective as using a pickaxe. Consider the type of terrain you’re working with and choose your tools accordingly.
4. Plan the layout
Before starting the actual landscaping, plan the layout of your project. Sketch out a rough idea of the design and consider where each element will be placed. This will help you visualize the final outcome and ensure that everything fits together nicely.
5. Be patient
Terraforming and landscaping can be a time-consuming process, so be patient. Take your time and work in small sections, focusing on one area at a time. This will help you avoid getting overwhelmed and make correcting mistakes easier as you go along.
Following these tips can prepare your terrain for successful and rewarding landscaping and terraforming projects. Remember to take the time to plan and analyze the terrain before starting any major modifications.
Creating Hills and Mountains
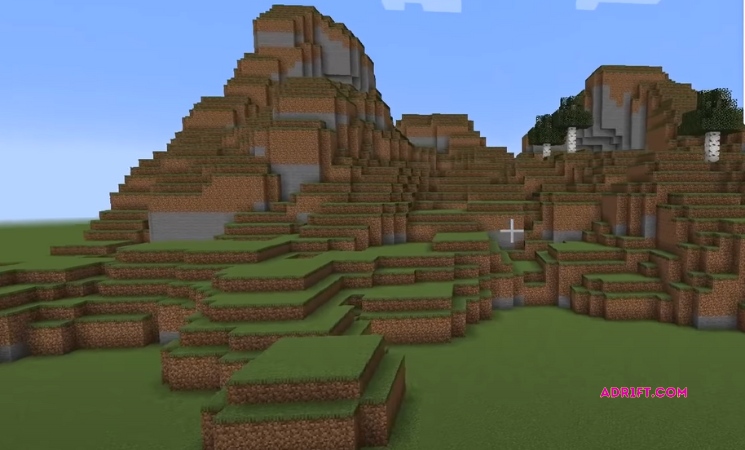
One of the most significant aspects of Minecraft is the opportunity to create your own world, including mountains, valleys, and hills. However, creating Minecraft’s ideal hills and mountains can be tricky, especially for new players. In this section of the article, I’ll share some tips on how to create hills and mountains in Minecraft seamlessly.
Creating the foundation
Before starting the actual creation, it is essential to set the foundation for the hills and mountains. To do that, start by building a base layer that will be the foothills of the mountain, typically around seven blocks high. Place the blocks in a V-shape with a flat area at the top to start the mountain base.
Sculpting the shape
Once the foundation is in place, it’s time to start forming the mountain’s shape. The most efficient way to create the mountain’s shape is to use the “tunneling” approach, where you dig out the inside of the mountain while sculpting the outside.
To create a more natural look, use a combination of multiple block types, placing blocks on top of each other to create height. You’ll need to keep stepping back and double-checking your progress to ensure that your mountain is the size and shape you want it.
Detailing the mountain
Using a combination of various block types, you can add more detail to the mountains, making them look more natural. Use different shades of green blocks, such as grass blocks and leaves, to make the hill or mountain look like it has vegetation. You can also use rocks to give a realistic effect.
To create the ideal hill and mountain, use your imagination and creativity to experiment with different block types and shapes to achieve the perfect look. Remember to keep stepping back to check on your progress and tweak it until you are satisfied with the result.
It might be helpful to create a custom texture pack for this to give a more realistic feel to the flora and fauna of the hills and mountains.
Creating realistic-looking hills and mountains in Minecraft can be challenging. However, with the right approach and some creativity, anyone can create a beautiful, lifelike world. I hope this guide has helped show you how to create the ideal hills and mountains in Minecraft.
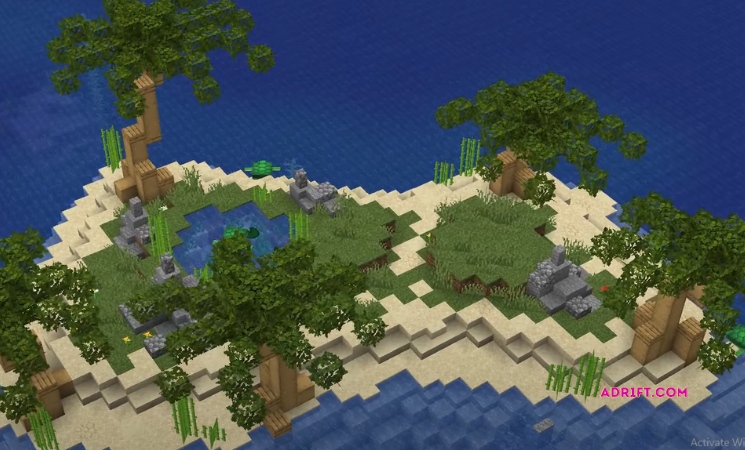
Developing Waterways, Rivers, and Lakes

One of the most exciting projects that I have ever undertaken in Minecraft is the development of waterways, rivers, and lakes in my world. With just a little bit of effort and creativity, you can transform bland waters into stunning aquatic features that will add depth and beauty to your Minecraft world. Here are some steps you can follow to help you create the perfect waterway, river, or lake in Minecraft.
Choosing the Right Location
When looking for the ideal location to create your water feature, it’s important to consider the surrounding terrain. Try to find a location that is naturally contained, for example, surrounded by mountains or hills. This will make it easier to create a realistic-looking body of water, as it will already have natural boundaries.
Preparing the Terrain
Once you have selected the location, it’s time to start modifying the terrain to accommodate your water feature. If you’re creating a river, dig a trench in the ground, making sure the path meanders gently between the surrounding terrain. For lakes, dig a relatively shallow depression, and make sure it’s uniform in depth.
Adding Water
The next step is to add water to your newly modified terrain. You can do this by either using buckets of water or a water source block. Make sure to add water to your prepared area to get the best results.
Adding Details
Once you have your river, waterway, or lake laid out, it’s time to add details. Adding vegetation, such as reeds and lily pads, around the edges will make it look more natural. You can also add depth and dimension to your water feature by varying the depth and texture of the underwater terrain.
Developing waterways, rivers, and lakes in Minecraft is a fantastic way to add depth and beauty to your world. With a bit of effort and creativity, you can create stunning aquatic features that will make your world stand out.
Just make sure to carefully choose the location, prepare the terrain, add water, and add details to create an immersive, realistic body of water that will impress your friends and add value to your Minecraft experience.
Adding Trees, Foliage, and Vegetation in Minecraft
Adding trees, foliage, and vegetation in Minecraft can enhance your world’s overall look and feel. Not only will it provide a more organic and natural look, but it will also help to improve the environment for certain mobs and animals.
To begin adding trees, you’ll need to gather saplings. Saplings can be obtained by chopping down leaves or by trading with villagers. Once you have a sapling, you can plant it on any grass block by right-clicking on it with the sapling in your hand.
Different trees require different conditions to grow. For example, oak trees need space to grow and can’t be planted too close to other trees or blocks. Birch trees, on the other hand, can be planted in close proximity to other birch trees without issues.
Foliage can also be added to trees to give them an even more natural look. To add foliage, simply place leaves on blocks adjacent to the trunk of the tree. This will cause the leaves to grow and spread over time.
In addition to trees and foliage, other vegetation can also be added to your Minecraft world. Grass can be planted by simply placing dirt blocks and waiting for the grass to spread to them. Flowers can also be planted on grass blocks, adding a pop of color to your scenery.
Finally, it’s important to note that adding trees and vegetation can improve the environment for certain animals and mobs. For example, rabbits will spawn more frequently in areas with a lot of foliage and tall grass. Similarly, sheep will frequently graze on grass blocks, so by planting more grass, you’ll be helping to sustain a larger population of sheep.
Designing man-made structures and buildings
In addition to terraforming and landscaping, Minecraft allows for creating intricate designs for man-made structures and buildings. Here are some tips and techniques to help you design and build your very own masterpieces in Minecraft.
- Planning and Sketching: Before you start building, having a plan in mind is important. Spend some time sketching out your design on paper or in a digital format. This will help you visualize the final product and serve as a reference as you build.
- Choosing a Theme: Choose a theme for your structure, whether it’s medieval, futuristic, or organic. The choice of theme will affect various aspects of your design, such as the materials, shapes, and colors used.
- Structural Integrity: Ensuring its structural integrity is the key to a successful building. Plan your build in a way that distributes weight evenly and builds support systems such as pillars, arches, or beams.
- Material Selection: The right materials are vital for achieving your structure’s desired look and feel. Use a variety of blocks and textures to create depth and interest.
- Detailing: Add detailing to your structure by using half-blocks, stairs, slabs, and decorative blocks. This will give your structure a polished and complex look.
- Lighting: Lighting is crucial in making your structure look more alive and enhancing its beauty. Depending on your theme, experiment with different lighting sources, such as torches, glow stones, or Redstone lamps.
Building man-made structures and buildings in Minecraft can be an enriching experience. With careful planning and execution, you can create something remarkable you can be proud of.

Adding Lighting and Ambiance
When you’re finished with the terraforming and landscaping process, lighting and ambiance to your Minecraft world can bring it to life. The right lighting can set the mood and make all of your hard work stand out even more.
Here are some tips to help you add lighting and ambiance to your Minecraft world:
- Torch placement: Torch placement is important for creating ambient lighting. Try placing torches around the edges of your building, near windows, or near walkways.
- Lanterns: Lanterns are a great alternative to torches if you want a more refined look. They can be placed on walls, ceilings, and even outdoors.
- Redstone lamps: Redstone lamps can be controlled with a lever or button, making it easy to turn them on or off as needed. They can be used for everything from lighting up a room to creating a disco floor.
- Glowstone: Glowstone blocks emit bright light and look great when placed on the ceiling or floor of a room. They can also be used as a light source for outdoor builds.
- Fire and lava: Fire and lava are great for adding ambient lighting to a build. Just be sure to use caution when placing them, as they can be dangerous.
- Colored lighting: You can add color to your lighting by using colored torches, colored glass blocks, or colored wool blocks.
- Day and night sensors: Day and night sensors can be used to automate lighting in your builds. For example, you can use a day sensor to turn off indoor lighting during the day or a night sensor to turn on outdoor lighting at night.
With these tips, you can add the perfect lighting and ambiance to your Minecraft world, making it look even more impressive.
Customizing Player Experience through Gameplay
Minecraft’s open-world sandbox gameplay provides countless opportunities for players to customize their gaming experience by interacting with the vast landscape they’re given. Terraforming and landscaping are fantastic ways to shape and mold the land according to a player’s design and preference.
Through terraforming the land, players can create levels, hills, valleys, and other terrain elements. By landscaping it, they can add trees, flowers, building materials, water features, and other environmental elements that make the world feel alive.
Customizing player experience through gameplay is an essential part of Minecraft’s charm. It allows players to immerse themselves in a world that they have full control over while expressing their creativity. Here are some ways players can customize their Minecraft gameplay through terraforming and landscaping:
- Terrain modification: With terraforming, players can create hills, mountains, volcanoes, and other geographical features that give their world a more dramatic look. The terrain modification can make the game world seem alive and natural.
- Water manipulation: Minecraft has fantastic water physics that allows players to make intricate structures underwater. By using water features, players can transform their game world into an aquatic wonderland with rivers, lakes, and waterfalls.
- Customized building materials: Minecraft’s endless combination of blocks and materials can inspire players to create bespoke materials that reflect their personalities. They can craft building materials that mimic the look of bricks, wood, concrete, and other real-world materials.
- Customized flora and fauna: Players can plant their gardens, nurseries, and farms and introduce animals in their gaming world. They can raise livestock, feed animals, and interact with them as they would in real life. Customized flora and fauna can make Minecraft’s world feel alive and vibrant.
By modifying terrain, manipulating water, customizing building materials, and introducing flora and fauna, players can create a world that’s unique and truly their own.
Optimizing and Sharing Your World
Once you have completed terraforming and landscaping in Minecraft, the next step is to optimize and share your world. In this section, I will share tips on how to make your world more enjoyable and accessible to other Minecraft players.
1. Back up Your World
Before sharing your world with other players, it’s important to back it up. This way, you won’t lose your hard work in case something goes wrong. You can back up your world by copying the game’s save files to a different location on your PC.
2. Optimize Your World
Optimizing your world means improving its performance, reducing lag, and making it look better.
Here are a few ways to optimize your world:
- Use Optifine: Optifine is a mod that optimizes Minecraft’s performance and graphics. It can reduce lag and improve FPS, making your world smoother to play.
- Remove unnecessary entities: Large numbers of entities like animals and monsters can cause lag. Remove any unnecessary entities using mods like CleanView or LagGoggles.
- Use fewer redstone contraptions: Redstone contraptions can also cause lag. Use fewer of them or try to simplify existing ones to reduce lag.
3. Share Your World
Sharing your world allows other players to enjoy your creations and can give you feedback on your work.
Here are a few ways to share your world with others:
- Share your world on Minecraft forums: There are many Minecraft forums where you can share your world with others. This is a good way to get feedback on your creations or even collaborate with other players.
- Share your world on Minecraft Realms: Minecraft Realms is a paid service that allows you to share your world with other players. It’s a good option if you want to play with a small group of friends or family.
- Share your world on servers: Minecraft servers are another great way to share your world. There are many servers with different themes and mods, so finding the right server for your world shouldn’t be a problem.
By following these tips, you can easily optimize and share your Minecraft world. Don’t forget to back up your world before making any changes, and always be open to feedback and collaboration. Happy gaming!
Conclusion
In this Minecraft terraforming and landscaping guide, I have shared with you some of the essential techniques and tips for creating stunning landscapes in your Minecraft world. From the basics of terrain manipulation to adding vegetation and water features, we have explored many tools and methods to help you bring your visions to life.
As we conclude, it’s important to remember that terraforming and landscaping in Minecraft is an ongoing process that requires patience, experimentation, and creativity. Practice makes perfect, so don’t be discouraged if your first attempts don’t turn out exactly as you imagined. With persistence and a willingness to learn, you can create breathtaking landscapes that will leave you and your fellow players in awe.
I hope this guide has been helpful to you and has given you the confidence and inspiration to start your own terraforming and landscaping projects in Minecraft. Remember, the possibilities are limited only by your imagination. Give it a try, and see what amazing creations you can come up with!
